

Swaging
Swaging consists in widening the tooth upsetting metal equally on each part of the rake side.
The swaging is obtained thanks to two tools :
- The swaging die that upsett metal by rotating
- The anvil that prevents the metal from going on the upper side of the tooth.
Those tools can be fixed either on :
- A manual device
- A pneumatic device
- An automatic machine
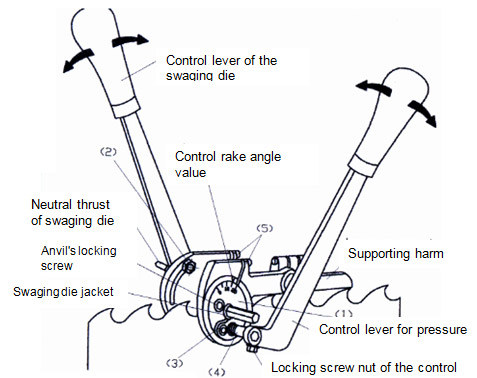
1) Former devices Type MFLS.
They break chip at the end of the swaging but they loose some degrees on the rake angle (4° à 5°).
To swage again with these devices, it is necessary to sharpen previously the blade to level it and to suppress a major part of the former swaging.
Then, it is necessary to put chalk of greasepaint or swaging clay on all the rake areas.
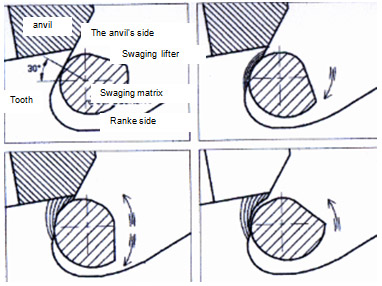
Functionning :
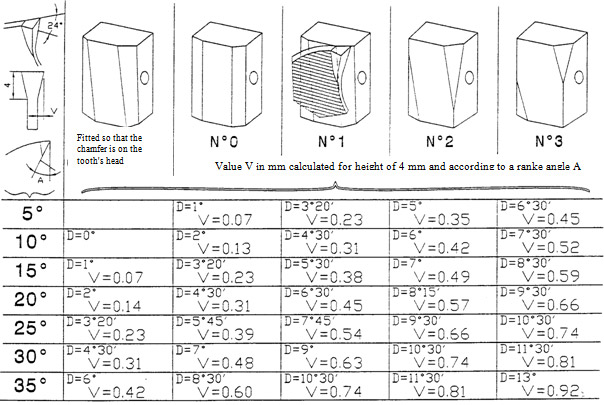
Choosing the anvil depends on the rake angle : more the rake angle is significant, more the chamfer of the anvil is small.
The swaging die varies according to the height of the the rake side.
- Diameter 10 mm : height of rake side is minimum 7 mm.
- Diameter 12 mm : height of rake side is minimum 8.5 mm.
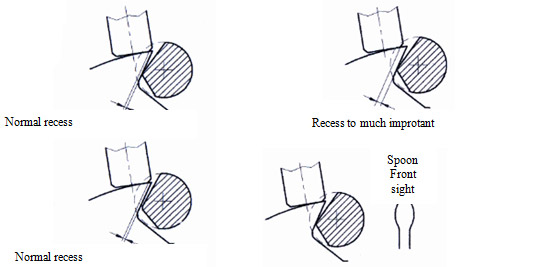
Settle the cutting point by coming down lightly the anvil and by rotating the swaging die untill there is a small resistance.
By forcing a bit more on the swaging die, it can be possible to go freely to the thrust of the swaging die haft. This thrust will be settled a few milimiters near the cutting point.
Then put the device on the blade to settle the clearance angle. It consists in positionning the anvil flat on the tooth's back.
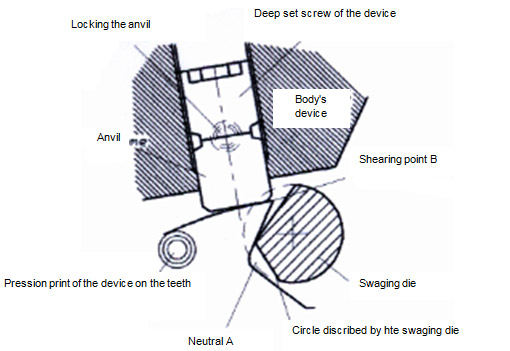
2) On devices EUROPA MFLS type
There is not any cutting point, the anvil is buttressed onto the swaging die. The latter is in high position, the lever on the right.
To adjust the device on the blade according to the clearance angle, it is necessary to withdraw the swaging die and to check thanks to its seating if the anvil is put flat on the tooth.
When reassembling make sure the swaging die is in the right direction, for new blade it is necessary to swage the blade two time and to the swaging device between each removal. To swage again a blade, it is done on the former swaging, only one removal is necessary. Do not forget the chalk of greasepaint or swaging clay.
These devices are designed in order to lenghten the metal forward so that the rake angle is slightly reduced.
Before swaging make sure the blade is adjusted respect to the anvil by adjusting locking screws
Then swage the blade and check the kerf value on each side of the tooth. A bad of the swaging can come from :
- The sharpening machine is badly adjust.
- The device is badly adjust on the blade.
- The swaging die o the anvil is damaged.
- Swaging device sleeve or the device 's body is worn.
- Locking screws are worn.
When the blade is swaged then the side are dressed.
For a swaging without broke chip, it is necessary to sharpen two times to equalize and strengthen teeth's lines.
Side dressing is used for giving the same removal value to all the teeth, a front and side clearance to the swaging and to strenghten the latter due to a side upsetting.
To adjust the device, put the anvils or jaws of side dressing against the blade and put the lever in clamping position. This adjustment is to be done each time there is a significant difference in blade's thickness.
The side dressing value will be given by moving the buttress that position the device respect to the tooth side.
Dressing do not correct a bad adjusting of the swaging. To correct it, side dressing thanks to grinding wheels can be used after swaging manually which increase the quality and the regularity of the removal.